Lab #1: Inode Manager
Due: 2015-3-27 00:00
Get ready
You should be able to do Lab 1 on any Unix-style machine, including your own Linux desktops, MacOS laptops. However, for Labs 2 and beyond, you'll need to use a computer that has the FUSE module, library, and headers installed. You should be able to install these on your own machine by following the instructions at here; we have already built the environment for you in the VM image. For your convenience, we also provide you a VM image running on VMware. (NOTE: the initial password for user named "cse" is "cselab”).
If you use our image and do not like working in command line, you can install any graphical interface like Gnome. Following commands can help you install KDE, which is a windows-style GUI.
%sudo apt-get install x-window-system-core
%sudo apt-get update
%sudo apt-get install kde-core
%sudo reboot
Introduction
In this lab, you will firstly implement an inode manager to support your file system, where following APIs should work properly:
CREATE, GETATTR
PUT, GET
REMOVE
Before implementing your inode manger, let's have a glance at the YFS architecture:
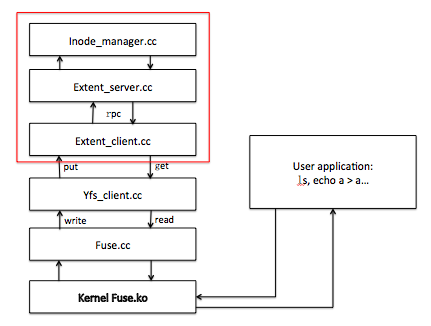
In lab1, you can completely ignore the fuse and yfs_client, but just concern about the parts framed by the red box: extent_client, extent_server and inode_manager.
Extent_client acts as a block provider just like a disk. It will communicate with extent_server using rpc (which you will implement in the future, just now it only uses direct and local function call).
The inode manager mimics the inode layer of alloc_inode, free_inode, read_file, write_file, remove_file, getattr, which support the five APIs (CREATE/GETATTR/PUT/GET/REMOVE) provided by extent_server.
If you have questions about this lab, either in programming environment or requirement, please ask TA: Gu Jinyu (sjtu_gujinyu AT qq.com ).
Getting started
% mkdir lab-cse
% cd lab-cse
% git clone http://ipads.se.sjtu.edu.cn:1312/gjy/cse-2015.git lab1 -b lab1
% cd lab1
% git checkout lab1
% make
If there's no error in make, an executable file lab1_tester will be generated, and after you type
% ./lab1_tester
you will get following output:
========== begin test create and getattr ==========
...
--------------------------------------------------
Final score is : 0
If you see additional warnings/errors, it's most likely because you don't have some specific libraries installed. Use the apt-file utility to look up the correct package that contains the file you need, if you are on debian-based system.
This lab will be divided into 3 parts:
Before you write any code, we suggest that you should read inode_manager.h first and be familiar with all the classes. We have already provide you some useful functions such as get_inode and put_inode.
In part 1, you should implement disk::read_block and disk::write_block inode_manager::alloc_inode and inode_manager::getattr, to support CREATE and GETATTR APIs. Your code should pass the test_create_and_getattr() in lab1_tester, which tests creating empty files, getting their attributes like type.
In part 2, you should implement inode_manager::write_file, inode_manager::read_file, block_manager::alloc_block, block_manager::free_block, to support PUT and GET APIs. Your code should pass the test_put_and_get() in lab1_tester, which, write and read files.
In part 3, you should implement inode_manager::remove_file and inode_manager::free_inode, to support REMOVE API. Your code should pass the test_remove() in lab1_tester.
In this lab, you should only need to make changes to inode_manager.cc. (Although you are allowed to change many other files, except those directly used to implement tests.) Although maybe we won't check all the corner case, you should try your best to make your code robust. It will be good for the coming labs.
Part 1: CREATE/GETATTR
Your job in Part 1 is to implement the read_block and write_block of disk and the alloc_inode and getattr of inode_manager, to support the CREATE and GETATTR APIs of extent_server. You may modify or add any files you like, except that you should not modify the lab1_tester.cc. (Although our sample solution, for lab1, contains changes to inode_manager.cc only.)
The tips can be found on the codes of inode_manager.[h|cc]. Be aware that you should firstly scan through the code in inode_manager.h, where defines most of the variables, structures and macros you can use, as well as the functions get_inode and put_inode of inode_manager I leave to you to refer to.
Meanwhile, pay attention to one of the comments in inode_manager.c:
// The layout of disk should be like this:
// |<-sb->|<-free block bitmap->|<-inode table->|<-data->|
It may be helpful for you to understand most of the process of the data access.
After you finish these 4 functions implementation, run:
% make
% ./lab1_tester
You should get following output:
========== begin test create and getattr ==========
…
…
========== pass test create and getattr ==========
========== begin test put and get ==========
…
…
[TEST_ERROR] : error …
--------------------------------------------------
Final score is : 40
Part 2: PUT/GET
Your job in Part 2 is to implement the write_file and read_file of inode_manager, and alloc_block and free_block of block_manager, to support the PUT and GET APIs of extent_server.
You should pay attention to the indirect block test. In our inode manager, each file has only one additional level of indirect block, which means one file has 32 direct block and 1 indirect block which point to a block filled with other blocks id.
After you finish these 4 functions implementation, run:
% make
% ./lab1_tester
You should get following output:
========== begin test create and getattr ==========
…
…
========== pass test create and getattr ==========
========== begin test put and get ==========
…
…
========== pass test put and get ==========
========== begin test remove ==========
…
...
[TEST_ERROR] : error …
--------------------------------------------------
Final score is : 80
Part 3: REMOVE
Your job in Part 3 is to implement the remove_file and free_inode of inode_manager, to support the REMOVE API of extent_server.
After you finish these 2 functions implementation, run:
% make
% ./lab1_tester

You should get following output:
========== begin test create and getattr ==========
...
========== pass test create and getattr ==========
========== begin test put and get ==========
...
========== pass test put and get ==========
========== begin test remove ==========
...
...
========== pass test remove ==========
Final score is : 100 ```
Handin procedure
After all above done:
% cd ~/lab1
% make handin
That should produce a file called lab1.tgz in your lab1/ directory. Change the file name to your student id:
% mv lab.tgz [your student id]-lab1.tgz
Then upload [your student id]-lab1.tgz file to ftp://535603986:public@public.sjtu.edu.cn/upload/ before the deadline. You are only given the permission to list and create new file, but no overwrite and read. So make sure your implementation has passed all the tests before final submit. (If you must re-submit a new version, add explicit version number such as "V2" to indicate).
You will receive full credit if your software passes the same tests we gave you when we run your software on our machines.
Please take your time examining this lab and the overall architecture of yfs. There are more interesting challenges ahead waiting for you.